日期:2026年 05月 16日
標籤: n8n Linux Ubuntu Docker Docker-Compose Container Stable Diffusion ComfyUI WSL 2
摘要:n8n
應用所需:1. 已安裝 Windows 的 Docker Desktop (Use WSL 2 instead of Hyper-V)
2. 已安裝 Hyper-V
3. 顯示卡使用 RTX 5050 以上 (本篇 RTX 5070)
4. Windows 10 以上作業系統
5. 已安裝 ComfyUI
解決問題:家中很多長輩很喜歡轉貼早安/午安/晚安 文字 + 風景的圖片,說明如何透過 n8n + ComfyUI 自動化生成此類型圖片,並且轉發到 Line 上
相關參考:0002. 擺脫訂閱制!打造私有自動化基地:Ubuntu Server 環境下 Docker 部署 n8n 全攻略
相關參考:0028. 2026 最新|RTX 5070 + Docker + ComfyUI 完整安裝教學(Windows WSL2_)
基本介紹:本篇分為 6 大部分。
第一部分:問題描述
第二部分:n8n WorkFlow 架構圖
第三部分:第一階段:n8n 呼叫 ComfyUI API
第四部分:第二階段:n8n 處理圖片
第五部分:第三階段:n8n 推播 LineBot API
第六部分:Demo成果
第一部分:問題描述
Step 1:群組對話常見的長輩發圖
日常生活中,應該大部分有家族群組都能看到以下的圖片,早、午、晚滿常見圖片 + 問候語
本篇說明如何透過 n8n + ComfyUI 自動化生成此類型圖片,並且轉發到 Line 上
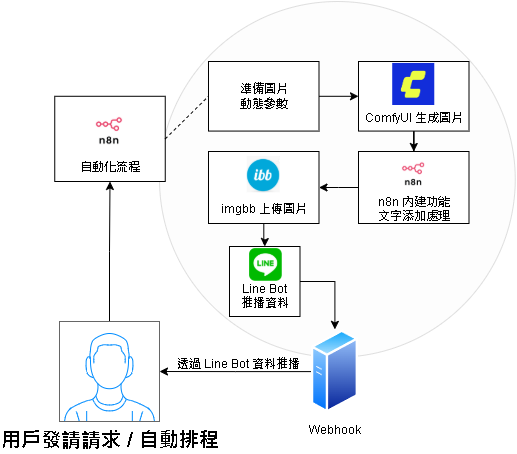
第二部分:n8n WorkFlow 架構圖
Step 1:技術棧架構圖
本篇範例主要使用的技術棧: n8n 隨機參數配置 + ComfyUI 生成圖片 + n8n 添加問候文字 + ImgBB 上傳圖片 + Line Bot 推播,完成自動化生成問候圖 + 發送
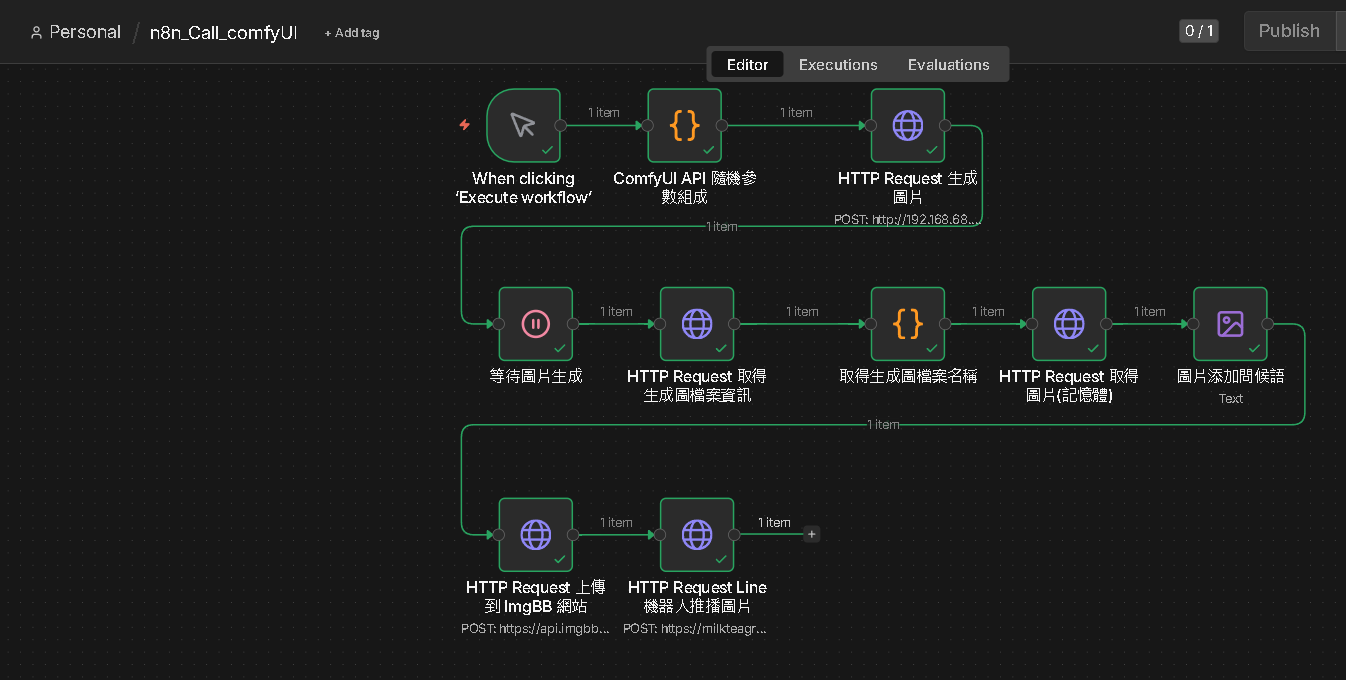
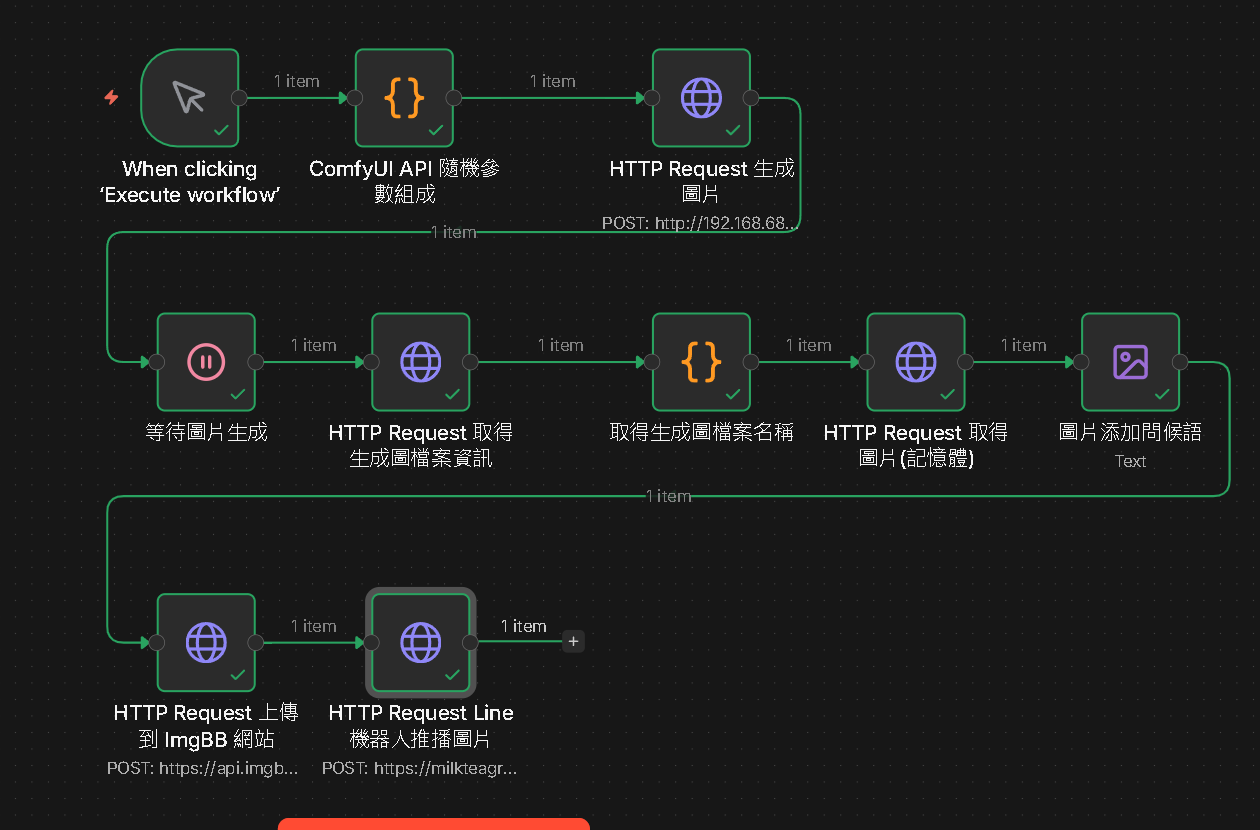
Step 2:n8n 最終 Workflow 圖
從參數配置、API、上傳imgBB,最後輸出到 Line 的自動化閉環
| 步驟順序 | : | n8n 節點名稱與功能說明 |
|---|---|---|
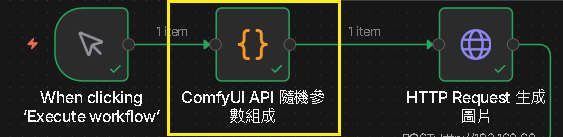
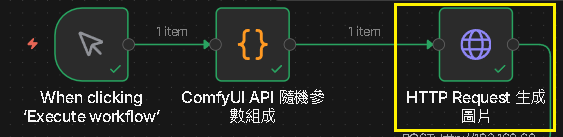
| 1. 觸發與設定 | : | When clicking ‘Execute workflow’ :手動或定時觸發流程。 |
| 2. 動態隨機參數 | : | ComfyUI API 隨機參數組成:傳入隨機圖片種子(Seed),並隨機挑選包括:場景類型、光線氛圍、特效細節、色調 |
| 3. 呼叫 ComfyUI | : | HTTP Request 生成圖片:呼叫 ComfyUI 的 API URL位址,並傳遞參數 |
| 4. AI圖片生成中 | : | 等待圖片生成:利用 ComfyUI 生成圖片,依照顯卡能力與參數配置設定等待秒數,這邊 50 秒。 |
| 5. 取得圖片資訊 | : | HTTP Request 取得生成圖檔案資訊:取得檔案唯一ID |
| 6. 取得檔案名稱 | : | 取得生成圖檔案名稱:透過唯一ID,再進一步取得檔案名稱 |
| 7. 取得圖片內容 | : | HTTP Request 取得圖片(記憶體):因為有對應的檔案名稱,因此可以找出 ComfyUI 生成的對應圖檔,轉為記憶體 |
| 8. 編輯圖片 | : | 圖片添加問候語:透過 n8n 將問候文字放入剛剛的圖片記憶體中。 |
| 9. 上傳至圖片庫 | : | HTTP Request 上傳到 ImgBB 網站:LineBot 不能直接上傳圖片,因此需要有一個中介點,產生 Image URL。 |
| 10. 推播圖片 | : | HTTP Request Line機器人推播圖片:透過 Messaging API 將圖片 URL 傳遞到 Line 上,使對應群組可以看到問候圖。 |
第三部分:第一階段:n8n 呼叫 ComfyUI API
Step 1:觸發與設定 - 2. 動態隨機參數
建立 Code 節點,參數如下 :
| Mode | Run Once for All Items |
| Language | Javascript |
主要解決讓圖片每次透過 ComfyUI 都能隨機化生成 (場景類型、光線氛圍、特效細節、色調)
// 隨機抽取函式
function pick(arr) {
  return arr[Math.floor(Math.random() * arr.length)];
}

var generateSeed = Math.floor(Math.random() * 999999999999999);

// 場景類型
const scenes = [
  "lush forest scenery, tall ancient trees with dense green foliage, a gentle stream flowing through the forest",
  "vast ocean cliff at sunset, dramatic waves crashing against rocks, sea spray in the air",
  "snow-capped mountain peak, frozen lake reflection, pine trees covered in snow",
  "golden wheat field at dawn, gentle breeze, rolling hills in the distance",
  "ancient cherry blossom garden, fallen petals floating in the wind, stone lanterns",
  "mystical desert oasis, palm trees, crystal clear pond, sand dunes at dusk",
  "autumn maple forest, vibrant red and orange leaves, misty mountain backdrop",
  "tropical waterfall paradise, lush green jungle, rainbow in the mist",
  "lavender field at golden hour, windmill in the distance, purple haze",
  "bamboo forest, soft morning light filtering through, peaceful stone path"
];

// 光線氛圍
const lightings = [
  "soft sunlight filtering through the leaves creating god rays",
  "dramatic golden hour lighting, long shadows",
  "misty morning fog, diffused soft light",
  "moonlight reflection on water, silver glow",
  "overcast magical light, ethereal atmosphere",
  "sunset warm orange and pink sky"
];

// 特效細節
const details = [
  "small glowing particles floating in the air, moss-covered ground and rocks",
  "fireflies glowing in the dusk, dewdrops on leaves",
  "falling cherry blossom petals, gentle wind ripples on water",
  "sparkling snow crystals, frozen breath in cold air",
  "floating dandelion seeds, wildflowers in the foreground",
  "morning dew on spider webs, tiny mushrooms on the ground"
];

// 色調
const colorTones = [
  "rich greens and natural tones",
  "warm golden and amber tones",
  "cool blue and silver tones",
  "vibrant purple and pink tones",
  "earthy brown and orange tones",
  "soft pastel tones"
];

const selectedScene    = pick(scenes);
const selectedLighting = pick(lightings);
const selectedDetail   = pick(details);
const selectedColor    = pick(colorTones);


const prompt = `masterpiece, best quality, score_7, safe, anime style, ${selectedScene}, ${selectedLighting}, ${selectedDetail}, highly detailed textures, soft lighting, calm and magical atmosphere, ${selectedColor}`;


const payload = {
  Data:{
  "prompt": {
  "8": {
    "inputs": {
      "samples": [
        "19",
        0
      ],
      "vae": [
        "15",
        0
      ]
    },
    "class_type": "VAEDecode",
    "_meta": {
      "title": "VAE解码"
    }
  },
  "11": {
    "inputs": {
      "text": prompt,
      "clip": [
        "45",
        0
      ]
    },
    "class_type": "CLIPTextEncode",
    "_meta": {
      "title": "CLIP Text Encode (Positive Prompt)"
    }
  },
  "12": {
    "inputs": {
      "text": "worst quality, low quality, score_1, score_2, score_3, blurry, jpeg artifacts, sepia",
      "clip": [
        "45",
        0
      ]
    },
    "class_type": "CLIPTextEncode",
    "_meta": {
      "title": "CLIP Text Encode (Negative Prompt)"
    }
  },
  "15": {
    "inputs": {
      "vae_name": "qwen_image_vae.safetensors"
    },
    "class_type": "VAELoader",
    "_meta": {
      "title": "加载VAE"
    }
  },
  "19": {
    "inputs": {
      "seed": generateSeed,
      "steps": 30,
      "cfg": 4,
      "sampler_name": "er_sde",
      "scheduler": "simple",
      "denoise": 1,
      "model": [
        "44",
        0
      ],
      "positive": [
        "11",
        0
      ],
      "negative": [
        "12",
        0
      ],
      "latent_image": [
        "28",
        0
      ]
    },
    "class_type": "KSampler",
    "_meta": {
      "title": "K采样器"
    }
  },
  "28": {
    "inputs": {
      "width": 1024,
      "height": 1024,
      "batch_size": 1
    },
    "class_type": "EmptyLatentImage",
    "_meta": {
      "title": "空Latent图像"
    }
  },
  "44": {
    "inputs": {
      "unet_name": "anima-preview2.safetensors",
      "weight_dtype": "default"
    },
    "class_type": "UNETLoader",
    "_meta": {
      "title": "UNet加载器"
    }
  },
  "45": {
    "inputs": {
      "clip_name": "qwen_3_06b_base.safetensors",
      "type": "stable_diffusion",
      "device": "default"
    },
    "class_type": "CLIPLoader",
    "_meta": {
      "title": "加载CLIP"
    }
  },
  "46": {
    "inputs": {
      "filename_prefix": "Anima",
      "images": [
        "8",
        0
      ]
    },
    "class_type": "SaveImage",
    "_meta": {
      "title": "保存图像"
    }
  }
},
  "client_id": "n8n-client"

  }

};

return {
  json: payload
};
Step 2:[補充] 如何知道 ComfyUI 的 Json 格式
我們在 Step 1 中的 Payload 是 ComfyUI 的 Json 格式資料,實際上這資料可以透過以下流程取得:
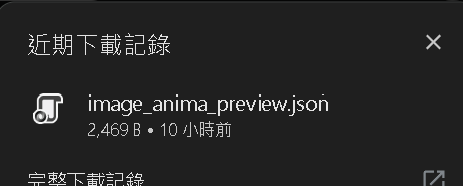
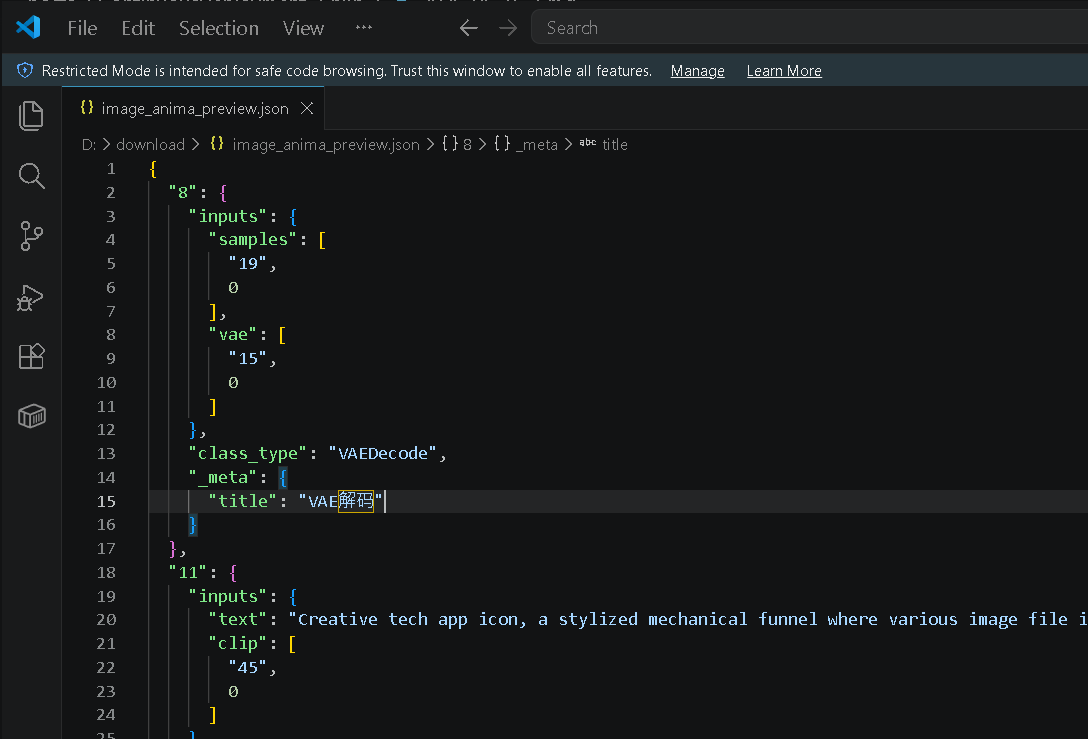
檢視自己的 ComfyUI -> 左上角圖形 -> 導出(API) -> 將下載出的檔案打開
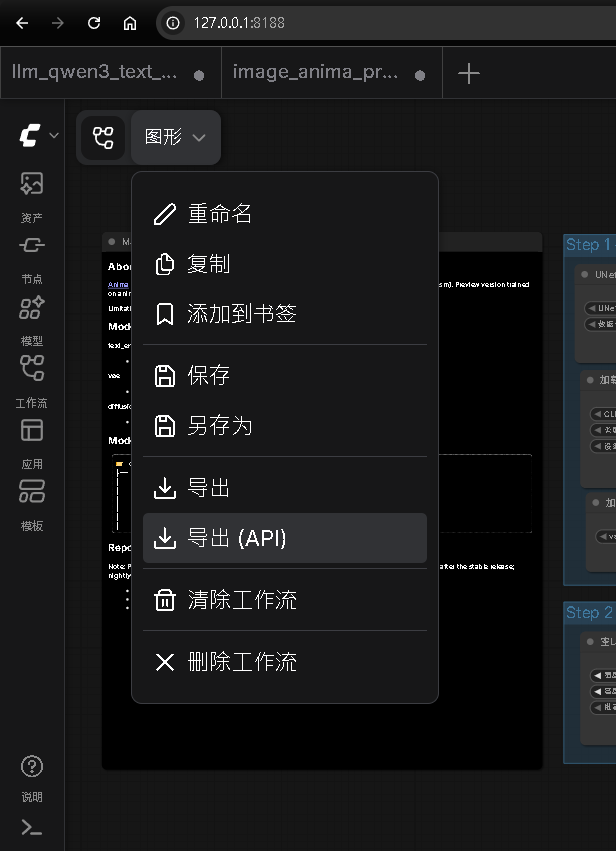
檔案打開後,可以取得對應的 Json 資料
Step 3:3.呼叫 ComfyUI - 呼叫生圖 API 對應位址
建立 Http Request 節點,參數如下 :
| Method | Post |
| URL | 您 Server ComfyUI 的 API 接口(包含域名) |
| Authentication | None |
| Body Content Type | JSON |
| Specify Body | Using JSON |
| JSON | {{ $json.Data }} |
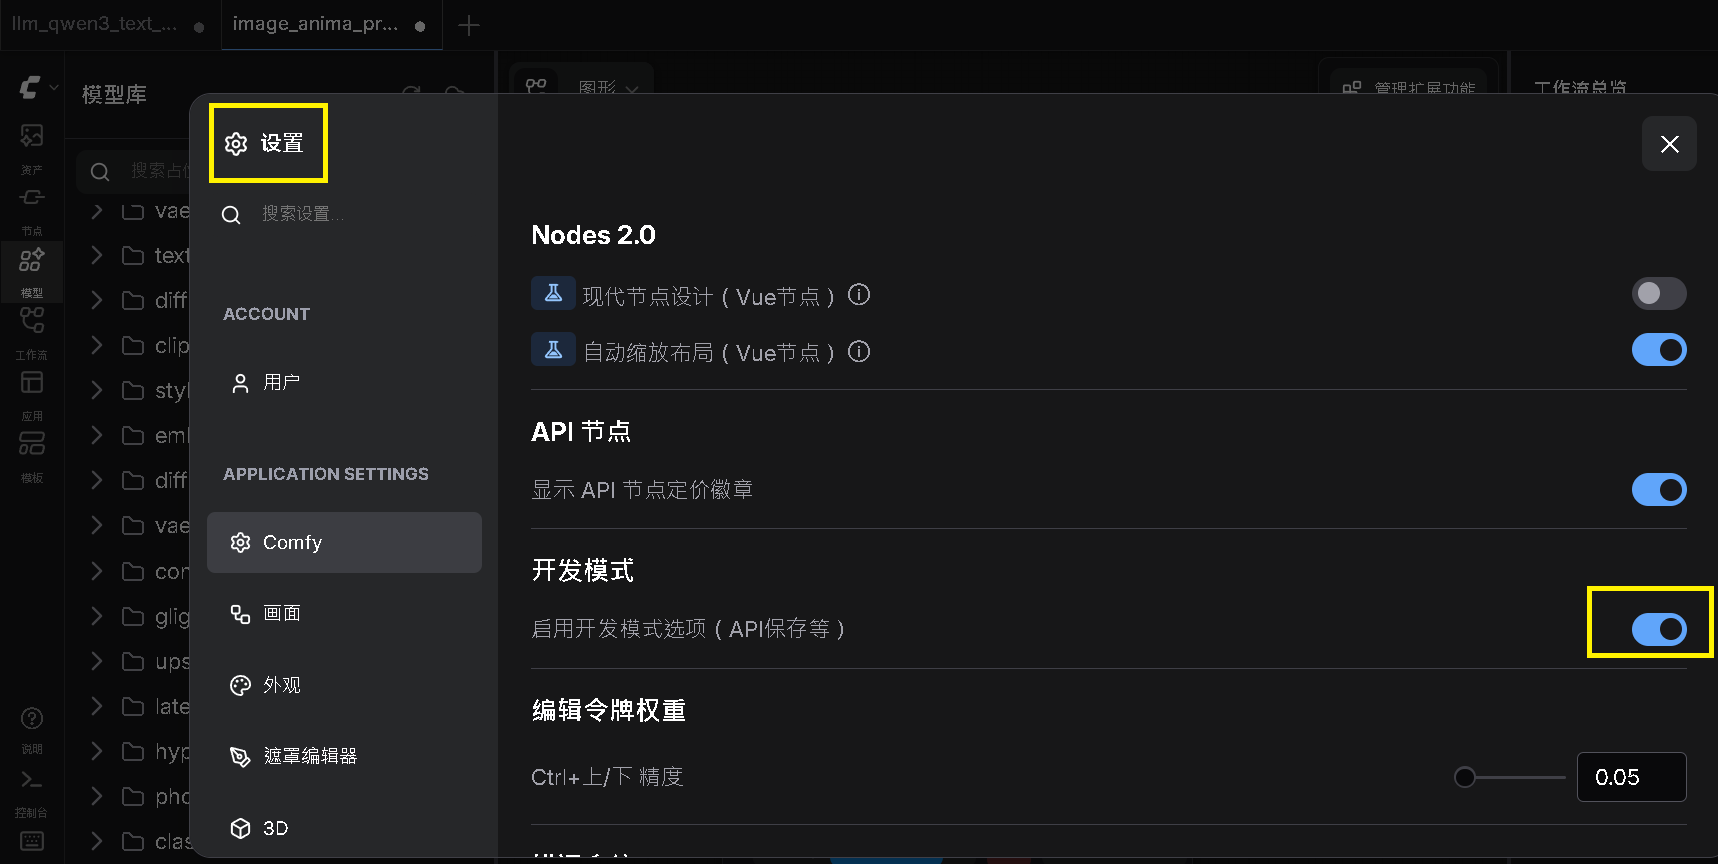
Step 4:[補充] 3.呼叫 ComfyUI - 呼叫生圖 API 對應位址 - 如何開啟 API
實際上要取得 ComfyUI 的 API 接口應進行以下操作:
進入 ComfyUI 容器 -> 左側開啟設置 -> 將 開發模式(启用开发模式选项(API保存等)) 開啟
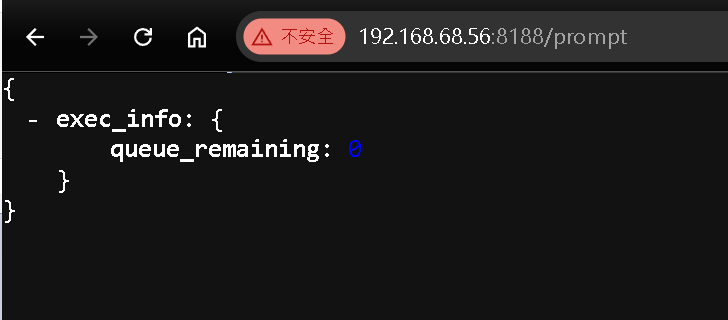
Step 5:[補充] 3.呼叫 ComfyUI - 呼叫生圖 API 對應位址 - 測試 API
接著要確認是否可以訪問 ComfyUI 容器內的 URL,可以輸入以下 IP 從瀏覽器嘗試訪問:
http://{您的主機IP}:{容器設定的Port號}/prompt
舉例來說:我的本機當前浮動 IP 為 192.168.68.56 並且 Port 號為 8188 所以組成後,若出現 exec_info 的 Json 參數化,表示成功訪問
第四部分:第二階段:n8n 處理圖片
Step 1:4.AI圖片生成中 - 觸發 ComfyUI 生成圖片並設定等待
建立 Wait 節點,參數如下 :
| Resume | After Time Interval |
| Wait Amount | 50.00 |
| Wait Unit | Seconds |
目的是等待圖片生成完成,再往下執行
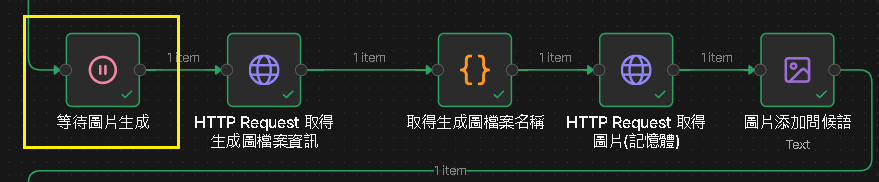
Step 2:5.取得圖片資訊 - 取得 ComfyUI 圖片ID
建立 Http Request 節點,參數如下 :
| Method | Post | |
| URL | http://192.168.68.56:8188/history/{{ $json.prompt_id }} | 您 Server ComfyUI 的 API 接口(包含域名) |
| Authentication | None |

Step 3:6.取得檔案名稱 - 取得圖片名稱
建立 Code 節點,參數如下 :
| Mode | Run Once for All Items |
| Language | Javascript |
主要返回檔案名稱給下一個 n8n 節點
const raw = $input.first().json;

// data 本身是字串,parse 它
const data = typeof raw === 'string' ? JSON.parse(raw) : raw;


// 再取第一個 key 就是 ID
const promptId = Object.keys(data)[0];
console.log(promptId);

var fileName = $input.first().json[promptId].outputs["46"].images[0].filename;

return {
   fileName: fileName
};

Step 4:7.取得圖片內容 - 轉成記憶體預處理
建立 Http Request 節點,參數如下 :
| Method | Post | |
| URL | http://192.168.68.57:8188/view?filename={{ $json.fileName }} | 您 Server ComfyUI 的 API 接口(包含域名) |
| Authentication | None |

Step 5:8.編輯圖片 - 添加問候語
建立 Edit Image 節點,參數如下 :
| 參數項 | 類型 | 補充說明 |
|---|---|---|
| Operation | Text | |
| Property Name | data | |
| Text | Good Morning | 這邊示意用,可自行增加 Code 判斷當前時間生成文字 |
| Font Size | 144 | 可自行調整參數值 |
| Font Color | #56EE28 | 可自行調整參數值 |
| Position X | 150 | 可自行調整參數值 |
| Position Y | 150 | 可自行調整參數值 |
| Max Line Length | 80 | 可自行調整參數值 |
目的是把問候語透過 n8n 編輯圖片的方式填上

第五部分:第三階段:n8n 推播 LineBot API
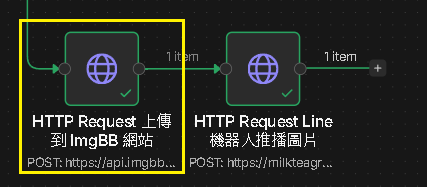
Step 1:9.上傳至圖片庫 - 上傳到 ImgBB 網站
建立 Http Request 節點,參數如下 :
| 參數項 | 類型 | 補充說明 |
|---|---|---|
| Method | Post | |
| URL | https://api.imgbb.com/1/upload?key=您的imgBB的金鑰 | 取得金鑰的方式可以看 Step2 - Step 4 補充部分 |
| Authentication | None | |
| Body Content Type | Form-Data | |
| Body | n8n Binary File | 第一個參數 |
| Type 使用 n8n Binary File | ||
| Name 使用 image | ||
| Input Data Field Name 使用 Data | ||
| Body | Form Data | 第二個參數 |
| Name 使用 name | ||
| Value 使用 {{ $json.fileName }} |
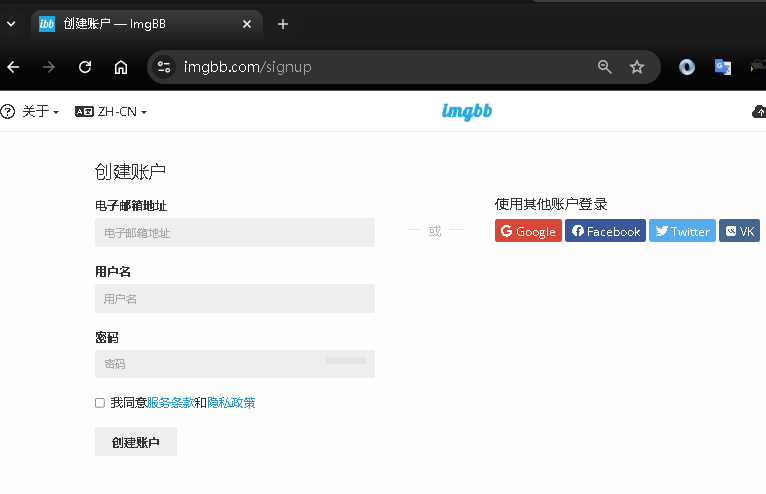
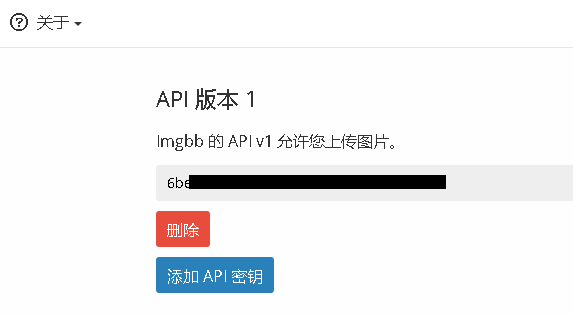
Step 2:[補充] 上傳到 ImgBB 網站 - 如何取得金鑰 - 創建帳戶
先進入官網 ImgBB 目的是有個存放圖片在公網的地方,讓 LineBot 可以直接發送 Image URL 到 Line 群組
依序填入資料創建帳戶
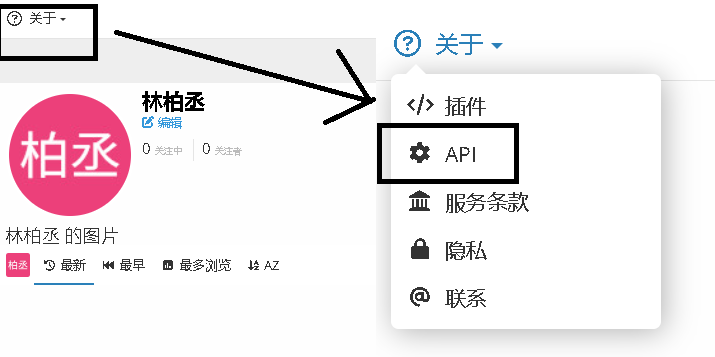
Step 3:[補充] 上傳到 ImgBB 網站 - 如何取得金鑰 - API設置
建立完帳號後,左上角 關於 -> API
Step 4:[補充] 上傳到 ImgBB 網站 - 如何取得金鑰 - 取得API金鑰
進入頁面後 -> Get API Key
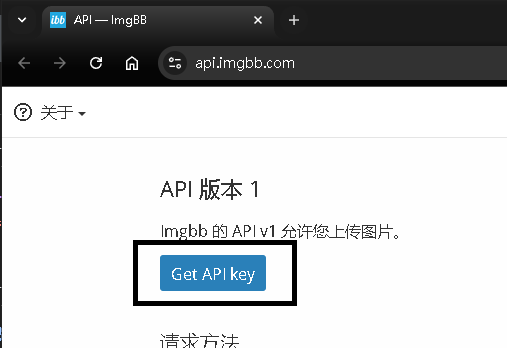
會生成一組金鑰,將取得的金鑰用於 Step 1 的金鑰位置即可
Step 5:10.推播圖片 - 透過 LineBot 推播
建立 Http Request 節點,參數如下 :
| Method | Post |
| URL | 您 Server LineBot 的 API 接口(包含域名) |
| Authentication | None |
| Body Content Type | JSON |
| Specify Body | Using Fields Below |
| Body Parameters 第 1 組 | Name => ImageUrl |
| Value => {{ $json.data.url }} | |
| Body Parameters 第 2 組 | Name => GroupId |
| Value => 您的 LineBot UserId / RoomId / GroupId |
這是最後一步驟,就可以將結果推給 LineBot 輸出 Line Image Message 到指定的訊息對話窗中

Step 6:[補充] 透過 LineBot 推播 - Webhook 代碼擴充
我們延續此篇的範例代碼,進行擴充:本篇範例代碼(.NET 9.0)
在 API 中擴充發圖片接口:
/// <summary>
/// 推播圖片至指定群組
/// </summary>
[HttpPost]
public async Task<IActionResult> LinePublishImage([FromBody] LineRequest request)
{
    try
    {
        await _lineBotService.HandleEventsPublishImageAsync(
            request.ImageUrl!,
            request.GroupId
        );
    }
    catch (Exception ex)
    {
        _logger.LogError(ex, "圖片推播失敗");
        return BadRequest("圖片推播失敗");
    }
    return Ok("圖片推播成功");
}
Step 7:[補充] 透過 LineBot 推播 - Webhook 代碼擴充 - 業務邏輯
對應 _lineBotService.HandleEventsPublishImageAsync() 方法,基於 LineBot 的限制,發送 Image URL
/// <summary>
/// 圖片推送
/// </summary>
public async Task HandleEventsPublishImageAsync(string imageUrl, string groupId)
{
    var imageMessage = new ImageMessage(
        originalContentUrl: imageUrl,  // 原始圖片 URL(最大 10MB)
        previerImageUrl: imageUrl      // 預覽圖片 URL
    );
    await _lineClient.PushMessageAsync(groupId, new[] { imageMessage });
}
第六部分:Demo成果
Step 1:執行 n8n
執行後,若所有節點都是正確的,會執行到 LineBot 發送
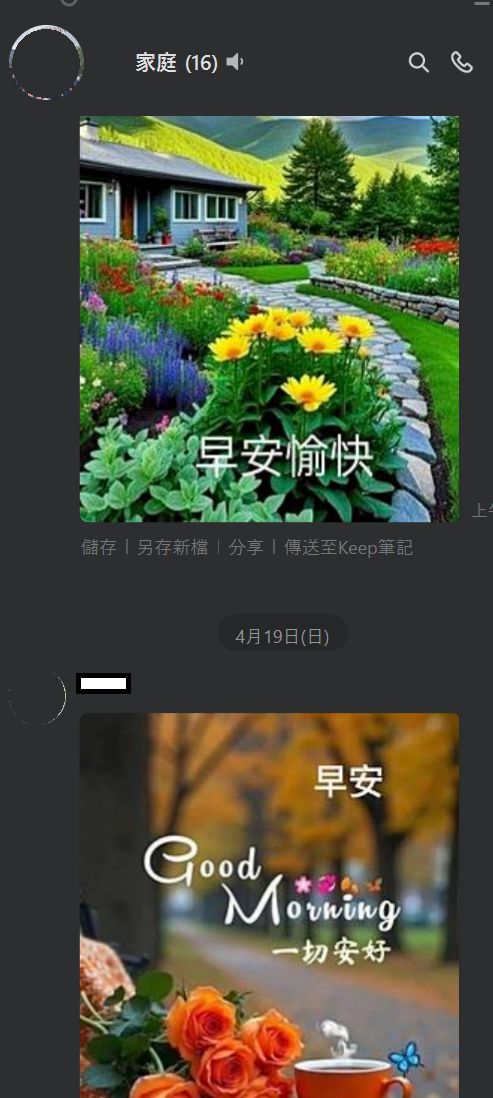
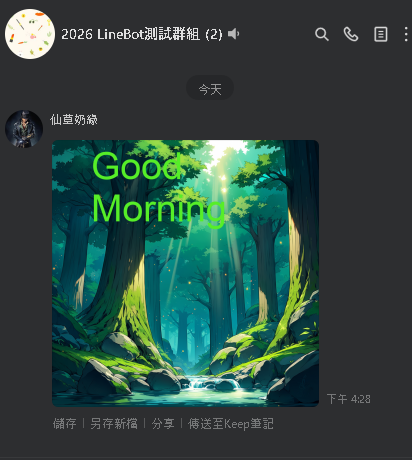
Step 2:LineBot 聊天室結果 - 成功接收
我們可以看到 LineBot 的聊天室群組,接收到了圖片畫面(實際上 LineBot 背後的邏輯是將 Image URL 發到聊天室群組)
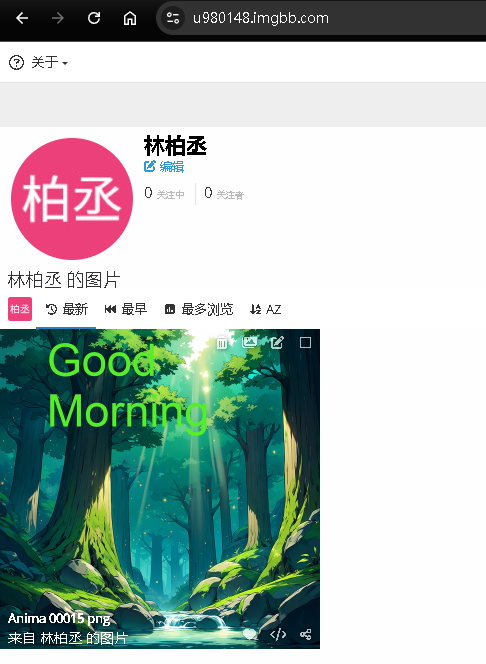
Step 3:[補充] imgBB 的帳號內容
回到 imgBB 自己的 API 帳號,可以觀察到實際上 n8n 是將圖片先上傳至此,在提供給用戶檢視