日期:2022年 06月 30日
標籤: C# Asp.NET Core Web MVC Web
摘要:C# 學習筆記
應用所需:1. .Net Core 6.0
2. Visual Studio 2019以上
解決問題:如何依照當前環境按下建置時使用對應環境的 appsettings.json (設定檔)配置
範例檔案:連結※用Visual Studio 2022
基本介紹:本篇分為2大部分。
第一部分:介紹解決問題(執行結果)
第二部分:實現流程
第一部分:介紹解決問題(執行結果)
Step 1:預期執行結果
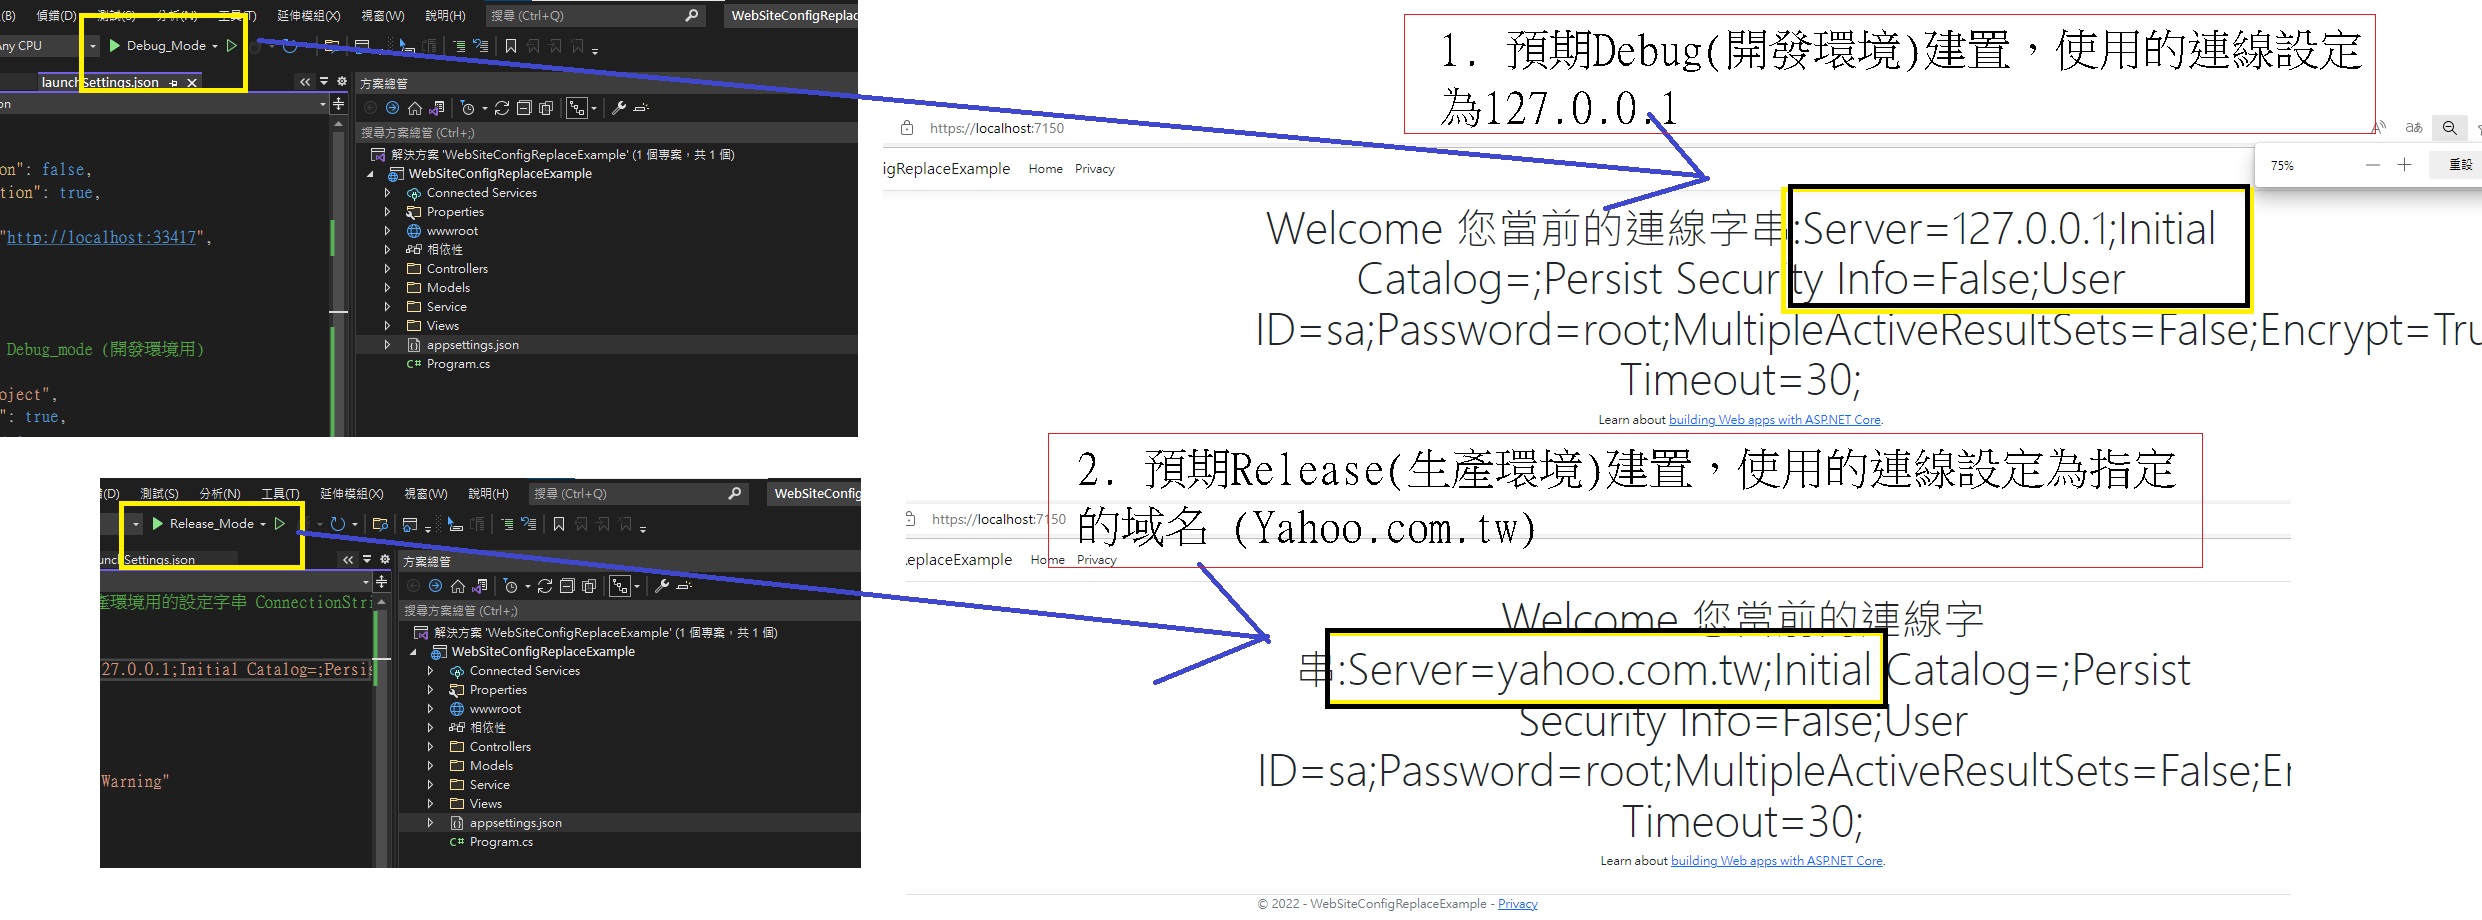
預期可以得到當前環境按下建置時快速切換配置設定
開發環境:上方為Debug模式得到127.0.0.1本地的連線設定字串
生產環境:下方為Release模式得到Yahoo.com.tw域名的連線設定字串

第二部分:實現流程
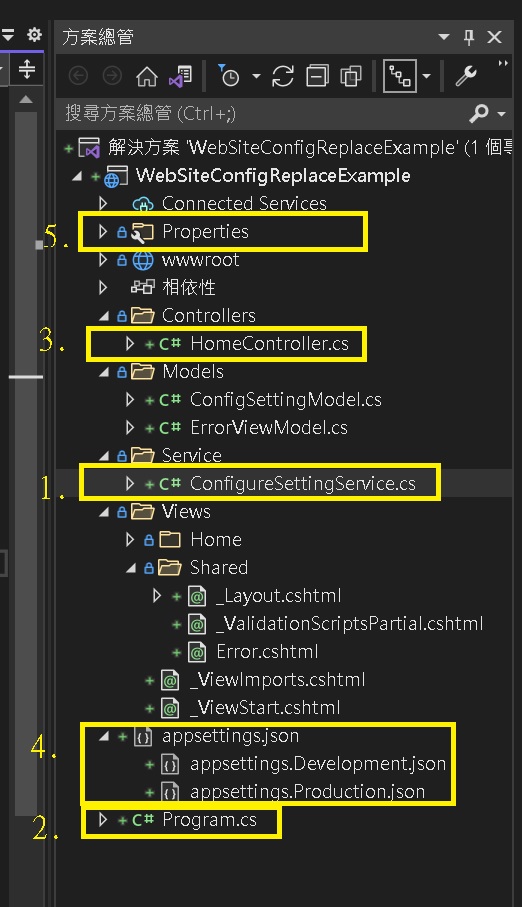
Step 1:範例專案代碼建構流程
如圖,順序依序是代碼建構的順序

Step 2:ConfigureSettingService.cs
建立ConfigureSettingService 將IConfiguration 注入到Class建構式中
/// <summary>
/// STEP1: 建立取得設定(IConfiguration)方法
/// </summary>
public class ConfigureSettingService
{
    private string _masterDatabase = string.Empty;
    public string MasterDatabase { get { return _masterDatabase; } }
    public ConfigureSettingService(IConfiguration configuration)
    {
        _masterDatabase = configuration["ConnectionStrings:MasterDatabase"];
    }
}
Step 3:Program.cs
在.Net Core Mini API的初始化中,將ConfigureSettingService 進行註冊
//STEP 2:註冊服務
builder.Services.AddSingleton<ConfigureSettingService>();
Step 4-1:HomeController.cs
Index() 的方法中,呼叫ConfigureSettingService中的 MasterDatabase (Property)
將當前appsettings.json 讀取到的連線字串顯示到頁面,用ViewBag接收
public IActionResult Index()
{
    //STEP3-1:以下兩種方法皆可取得設定值
    ViewBag.MasterDatabase = NotDIGetAppsettingMethod();
    ViewBag.MasterDatabase = _myConfigSetting.MasterDatabase;
    return View();
}
Step 4-2:補充不用DI的取設定值
以下Method內容,可以達到不用注入,但不推薦
/// <summary>
/// STEP3-2:非DI的方式取得設定檔案的方法
/// </summary>
/// <returns></returns>
private string NotDIGetAppsettingMethod()
{
    IConfiguration conf = (new ConfigurationBuilder()
        .SetBasePath(Directory.GetCurrentDirectory())
        .AddJsonFile("appsettings.json")
        .Build()
        );
    return conf["ConnectionStrings:MasterDatabase"].ToString();
}
Step 5-1:appsetting.json
將 appsettings.Development.json 增加 ConnectionStrings的相關設定
※這邊用127.0.0.1 做為示範
/* STEP 4-1:加入Development 開發環境用的設定字串 ConnectionStrings 的資訊 */
{
  "ConnectionStrings": {
    "MasterDatabase": "Server=127.0.0.1;Initial Catalog=;Persist Security Info=False;User ID=sa;Password=root;MultipleActiveResultSets=False;Encrypt=True;TrustServerCertificate=False;Connection Timeout=30;"
  },
  "Logging": {
    "LogLevel": {
      "Default": "Information",
      "Microsoft.AspNetCore": "Warning"
    }
  }
}
Step 5-2:appsetting.json
將 appsettings.Production.json 增加 ConnectionStrings的相關設定
※這邊用yahoo.com.tw 做為示範
/* STEP 4-2:加入Production 生產環境用的設定字串 ConnectionStrings 的資訊 */
{
  "ConnectionStrings": {
    "MasterDatabase": "Server=yahoo.com.tw;Initial Catalog=;Persist Security Info=False;User ID=sa;Password=root;MultipleActiveResultSets=False;Encrypt=True;TrustServerCertificate=False;Connection Timeout=30;"
  },
  "Logging": {
    "LogLevel": {
      "Default": "Information",
      "Microsoft.AspNetCore": "Warning"
    }
  }
}
Step 6:launchSettings.json
將”profiles”,底下新增兩個項目 Debug_Mode 與 Release_Mode
讀取的”ASPNETCORE_ENVIRONMENT” 分別為 “Development”與”Production”
{
  "iisSettings": {
    "windowsAuthentication": false,
    "anonymousAuthentication": true,
    "iisExpress": {
      "applicationUrl": "http://localhost:33417",
      "sslPort": 44349
    }
  },
  "profiles": {
    //STEP 5-1: 調整名稱 Debug_mode (開發環境用)
    "Debug_Mode": {
      "commandName": "Project",
      "dotnetRunMessages": true,
      "launchBrowser": true,
      "applicationUrl": "https://localhost:7150;http://localhost:5150",
      "environmentVariables": {
        "ASPNETCORE_ENVIRONMENT": "Development"
      }
    },
    //STEP 5-2: 新增名稱 Release_Mode (生產環境用)
    "Release_Mode": {
      "commandName": "Project",
      "dotnetRunMessages": true,
      "launchBrowser": true,
      "applicationUrl": "https://localhost:7150;http://localhost:5150",
      "environmentVariables": {
        "ASPNETCORE_ENVIRONMENT": "Production"
      }
    },
    "IIS Express": {
      "commandName": "IISExpress",
      "launchBrowser": true,
      "environmentVariables": {
        "ASPNETCORE_ENVIRONMENT": "Development"
      }
    }
  }
}
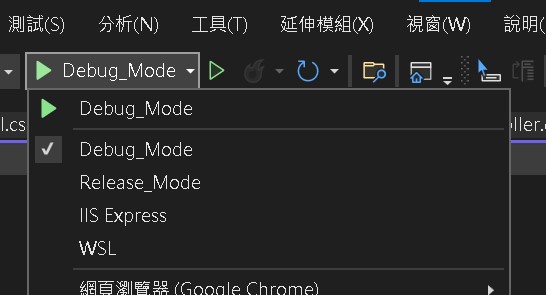
Step 7:Visual Studio建置按鈕更換
更換後可以發現按鈕配置變成我們設定的名稱,執行後,如第一部分的DEMO結果
